Lazy Loading Translations in Remix using i18next

Using one translation file per language with all of your app's translations may greatly increase page loading time, as the client needs to download every translation regardless of if they are used on the page being loaded. By splitting the translations into multiple "namespaces", we can divide them over several smaller files, and only download the ones we need for the page the user is requesting. Then when the user changes page, we can lazy load any new namespaces that are needed for the new route that they haven't already downloaded before showing the next page.
We're going to use remix-18next to handle our translations in this project. As a bonus, we'll set up the project to give us compile-time type safety on our namespaces and translation keys, so we can't accidentally use a namespace/key that doesn't exist (and also give us editor autocompletion!).
In a rush? Skip straight to the completed code here: https://github.com/matt-winfield/remix-translations-example
Aims
- Be able to translate our app into multiple languages
- Be able to split our translations into multiple files, and only download them as and when we need them.
- Full type-safety for namespaces and translation keys, to avoid typos and to give us auto-complete in the editor.
Step 1: Create a new project
If you already have a Remix project, you can skip this step. I'm going to use the Epic Stack template as a starting point, as it comes with many sensible defaults for configuration, but these steps should work with any Remix project.
Create a Remix project using:
npx create-remix@latest --install --init-script --git-init --template epicweb-dev/epic-stackAnd fill in the prompt for the name, answer "no" to the prompt to set up deployment. This will download all the dependencies and create your Remix project.
cd into your project and run npm run dev to start the server. Navigate to http://localhost:3000 and you should see the landing page!
Step 2: Add dependencies
Next, run npm install remix-i18next i18next react-i18next i18next-browser-languagedetector i18next-http-backend i18next-fs-backend to install remix-i18next, i18next and some of the other dependencies we need for this project, such as i18next-http-backend which we will use on the client-side to lazily fetch translations we don't have yet, and i18next-fs-backend which we will use on the server-side to load translation files for the inital render.
In the remix.config.js file, add remix-18next and accept-language-parser to serverDependenciesToBundle. This is to ensure these packages are included in the server bundle, as they aren't by default in Remix 2.0:
import { flatRoutes } from 'remix-flat-routes';

/**
 * @type {import('@remix-run/dev').AppConfig}
 */
export default {
    cacheDirectory: './node_modules/.cache/remix',
    ignoredRouteFiles: ['**/*'],
    serverModuleFormat: 'esm',
    serverPlatform: 'node',
    serverDependenciesToBundle: ['remix-i18next', 'accept-language-parser'],
    tailwind: true,
    postcss: true,
    watchPaths: ['./tailwind.config.ts'],
    routes: async (defineRoutes) => {
        return flatRoutes('routes', defineRoutes, {
            ignoredRouteFiles: [
                '.*',
                '**/*.css',
                '**/*.test.{js,jsx,ts,tsx}',
                '**/__*.*',
            ],
        });
    },
};
Step 3: Create some translation files
In the public folder of your project, create a locales folder containing two subfolders "en" (for English) and "es" (for Spanish). Your folder structure should look something like this:
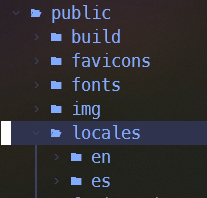
Now create a "common.json" and "first-feature.json" file, in both the en folder and the es folder. Each file corresponds to a namespace with the same name. Namespaces should be kept quite small, allowing the client to only download the translations that are needed for the page the user is currently on.
In this case, "common" is intended for translations that are used across nearly all pages and in many features (such as "OK", "Continue" etc.), which we will later make the default namespace. "first-feature" is intended to represent translations that are only used by a specific feature, and may only be needed on a few pages in your app. (In a "real world" app, this namespace would be named to match the feature(s) using it, or reflect the type of translations that are contained within it).
In en/common.json, place the following contents:
{
    "title": "Hello, world!",
    "subtitle": "Testing translations!"
}
In es/common.json:
{
    "title": "¡Hola Mundo!",
    "subtitle": "¡Probando traducciones!"
}
In en/first-feature.json, place the following contents:
{
    "test": "Test"
}
In es/first-feature.json, place the following contents:
{
    "test": "Prueba"
}
Step 4: Configure remix-18next
In the app folder, create an i18n.ts file with the following contents:
export default {
    // This is the list of languages your application supports
    supportedLngs: ['en', 'es'],
    // This is the language you want to use in case
    // if the user language is not in the supportedLngs
    fallbackLng: 'en',
    // The default namespace to use if not specified
    defaultNS: 'common',
    // Suspense is important, it prevents the page from loading until we have the translations
    react: { useSuspense: true },
};
This file is used to configure i18next. The useSuspense: true option is important - Remix with React 18 supports Suspense, which will prevent page navigation until we have loaded the correct translations for the page. Without this, the page might render before we have lazy-loaded all the translations used on the page, so the content might "flash" with invalid content before loading in the correct translation.
Also inside the app folder, create an i18next.server.ts file with the following contents:
import { resolve } from 'node:path';
import Backend from 'i18next-fs-backend';
import { RemixI18Next } from 'remix-i18next';
import i18n from '#app/i18n.ts';

let i18next = new RemixI18Next({
    detection: {
        supportedLanguages: i18n.supportedLngs,
        fallbackLanguage: i18n.fallbackLng,
    },
    i18next: {
        ...i18n,
        backend: {
            loadPath: resolve('./public/locales/{{lng}}/{{ns}}.json'),
        },
    },
    plugins: [Backend],
});

export default i18next;
This is the configuration that will run on the server-side to get the translations for the initial page render, so that the client doesn't have to fetch them. This is using the 18next-fs-backend plugin to read the JSON files from the file system.
Now update entry.client.tsx with the following code:
import { RemixBrowser } from '@remix-run/react';
import * as i18next from 'i18next';
import { type i18n as i18nType, type Module } from 'i18next';
import LanguageDetector from 'i18next-browser-languagedetector';
import Backend from 'i18next-http-backend';
import { startTransition, StrictMode } from 'react';
import { hydrateRoot } from 'react-dom/client';
import { I18nextProvider, initReactI18next } from 'react-i18next';
import { getInitialNamespaces } from 'remix-i18next';
import i18n from '#app/i18n.ts';

if (ENV.MODE === 'production' && ENV.SENTRY_DSN) {
    import('./utils/monitoring.client.tsx').then(({ init }) => init());
}

async function hydrate() {
    await i18next
        .use(initReactI18next) // Tell i18next to use the react-i18next plugin
        .use(LanguageDetector as unknown as Module) // Setup a client-side language detector
        .use(Backend) // Setup your backend
        .init({
            ...i18n, // spread the configuration
            // This function detects the namespaces your routes rendered while SSR use
            ns: getInitialNamespaces(),
            backend: { loadPath: '/locales/{{lng}}/{{ns}}.json' },
            detection: {
                // Here only enable htmlTag detection, we'll detect the language only
                // server-side with remix-i18next, by using the `<html lang>` attribute
                // we can communicate to the client the language detected server-side
                order: ['htmlTag'],
                // Because we only use htmlTag, there's no reason to cache the language
                // on the browser, so we disable it
                caches: [],
            },
        });

    startTransition(() => {
        hydrateRoot(
            document,
            <I18nextProvider i18n={i18next as unknown as i18nType}>
                <StrictMode>
                    <RemixBrowser />
                </StrictMode>
            </I18nextProvider>,
        );
    });
}

if (window.requestIdleCallback) {
    window.requestIdleCallback(hydrate);
} else {
    // Safari doesn't support requestIdleCallback
    // https://caniuse.com/requestidlecallback
    window.setTimeout(hydrate, 1);
}
This is modified slightly from the remix-i18next setup guide. This configures i18next to detect the users language, and wrap your app with an I18nextProvider (which is used by react-i18next to get the configuration). I'm doing some strange things with the types with as unknown as ... in some places here, Remix 2.0 currently gets confused about the types of these modules so we have to force them to be the right type (this is only an issue with compilation, the runtime code works fine).
Now update entry.server.tsx with the following content:
export default async function handleRequest(...args: DocRequestArgs) {
    // ...
    const callbackName = isbot(request.headers.get('user-agent'))
    ? 'onAllReady'
    : 'onShellReady'

    let instance = createInstance()
    let lng = await i18next.getLocale(request)
    let ns = i18next.getRouteNamespaces(remixContext)

    await instance
        .use(initReactI18next) // Tell our instance to use react-i18next
        .use(Backend) // Setup our backend
        .init({
            ...i18n, // spread the configuration
            lng, // The locale we detected above
            ns, // The namespaces the routes about to render wants to use
            backend: { loadPath: resolve('./public/locales/{{lng}}/{{ns}}.json') },
                })

    const nonce = String(loadContext.cspNonce) ?? undefined
    return new Promise(async (resolve, reject) => {
        let didError = false
		const timings = makeTimings('render', 'renderToPipeableStream')

        const { pipe, abort } = renderToPipeableStream(
            <NonceProvider value={nonce}>
                <I18nextProvider i18n={instance}>
                    <RemixServer context={remixContext} url={request.url} />
                </I18nextProvider>
             </NonceProvider>,
         // ...
This configures the server-side to find the browser language from the request object, and wrap the app in an I18nextProvider with the i18n instance in the correct language, reading the translation files from the file system.
Finally, in root.tsx, add the locale to the loader function (if you don't have a root loader, you'll need to create this. It's already created in the epic stack template):
import i18next from './i18next.server.ts';

// ...

export async function loader({ request }: DataFunctionArgs) {
    const locale = await i18next.getLocale(request);

    // ... Other stuff you might need to load in your root loader

    return json({
        locale,
        // ... Anything else your loader was returning
    });
}
Usage
That was a lot of configuration! But now everything is ready to use, so let's add some translations to the home page. To do this, we use the useTranslation() hook from react-i18next.
Edit the index page of your application. For most Remix apps this will be directly in the app/routes folder, but if you're using the Epic Stack template like me, this is located at app/routes/marketing+/index.tsx. Change the content to this code:
import { type MetaFunction } from '@remix-run/node';
import { useTranslation } from 'react-i18next';

export const meta: MetaFunction = () => [{ title: 'Epic Notes' }];

export default function Index() {
    const { t } = useTranslation();
    return (
        <main className="relative min-h-screen sm:flex sm:items-center sm:justify-center">
            <div className="relative sm:pb-16 sm:pt-8">
                <div className="mx-auto max-w-7xl sm:px-6 lg:px-8">
                    <div className="relative shadow-xl sm:overflow-hidden sm:rounded-2xl">
                        <div className="absolute inset-0">
                            <div className="absolute inset-0 bg-[color:rgba(30,23,38,0.5)] mix-blend-multiply" />
                        </div>
                        <div className="lg:pt-18 relative px-4 pb-8 pt-8 sm:px-6 sm:pb-14 sm:pt-16 lg:px-8 lg:pb-20">
                            <h1 className="text-center text-mega font-extrabold tracking-tight sm:text-8xl lg:text-9xl">
                                <span>{t('title')}</span>
                            </h1>
                            <h2 className="text-center text-2xl font-extrabold tracking-tight sm:text-4xl lg:text-5xl">
                                <span>{t('subtitle')}</span>
                            </h2>
                        </div>
                    </div>
                </div>
            </div>
        </main>
    );
}
Since we set the default namespace to common, const { t } = useTranslation() is the same as const { t } = useTranslation('common'). We then use `t('title')`` to get the translation with the key 'title' and render it. Now if you open http://localhost:3000 you should see "Hello, world!" and "Testing translations!", but if you try http://localhost:3000/?lng=es you should see "¡Hola Mundo!" and "¡Probando traducciones!".
You might notice that when you type t(' you don't get any suggestions as to which keys are valid, and if you put an invalid key the build still succeeds (although the client will error!). We'll fix this in the bonus section later!
Using multiple namespaces
You can use different namespaces (translation files) by specifying them in the useTranslation() hook:
const { t } = useTranslation('first-feature'); // Just one namespace
const { t } = useTranslation(['common', 'first-feature']); // Multiple namespaces
For example, in the about.tsx file, change the content to this code:
import { useTranslation } from 'react-i18next'

export default function AboutRoute() {
	const { t } = useTranslation('first-feature')

	return (
		<div>
			<h1>About page</h1>
			<p>{t('test')}</p>
		</div>
	)
}
This will only use the first-feature namespace for this route.
You aren't restricted to only doing this at the route-level either - The useSuspense: true option we set earlier allows us to do this in any component we like, no matter how deeply nested it is. This allows us to do the fetching at the "component level", instead of "route level" fetching. This isn't usually how data fetching (e.g. for calling APIs) is done in Remix, but for translations component-level fetching makes more sense (since a component will always need the same translations, and may be used in several routes).
We now only are fetching the first-feature.json file when the route needs it, and other routes won't fetch this file.
Summary
Use the following steps to add lazy-loaded translations to your Remix app:
- Install
remix-i18nextand the otheri18nextdependencies to your app - Create the translation files, split into small namespaces
- Add an
i18n.tsconfiguration file - Add the
i18next.server.tsserver-side configuration - Add the
entry.client.tsclient-side configuration - Add the
i18next.client.tsclient-side configuration - Add the
entry.server.tsxserver-side configuration - Add the locale to the root loader
- Use the
useTranslation()hook in your components and routes.
You can now add as many translations and namespaces as you want, and each page will only load the ones that it needs to render, ensuring that your page load time will be as low as possible.
Bonus - Add type-checking for keys and namespaces
We can add full type-safety to this system, which gives us some key benefits:
- Compile-time type checking of namespaces and keys - typos or missing namespaces / keys will be found easily
- Autocomplete - Your editor will suggest valid namespaces/keys as you type them, which is very helpful when you have hundreds of translations
We do this by extending the i18next CustomTypeOptions interface, as described in the i18next documentation. Add the following to the top of the i18n.ts file:
import 'i18next';
import type common from '#public/locales/en/common.json';
import type firstFeature from '#public/locales/en/first-feature.json';

declare module 'i18next' {
    interface CustomTypeOptions {
        defaultNS: 'ns1';
        resources: {
            common: typeof common;
            'first-feature': typeof firstFeature;
        };
    }
}

// ... The previous content goes here
Now you can go back to the about page and experiment with the auto-complete this gives you for the namespaces and translation keys, as well as the compile-time errors you will get if you try to use an invalid namespace or translation key:


I hope this was useful in helping you configure Remix to lazily load translation files!